How To Remove Virtual Machine only And Add it back to Virtualbox Temporarily Without Deleting Files

Removing Virtual Machines from VirtualBox
Welcome to this comprehensive guide on how to temporarily remove and add virtual machines in VirtualBox without deleting any files. VirtualBox is a powerful and versatile virtualization software that allows users to run multiple operating systems on a single physical machine. However, managing virtual machines can be a hassle, especially if you have a lot of them. In this guide, we will provide you with two different methods for removing virtual machines and two methods for adding them back. We will also include a video tutorial for visual learners. We will start with the first method of removing a virtual machine which involves closing the virtual machine and saving its state, then we will move on to the second method of removing a virtual machine by using the “Remove” option. Then we will proceed with the first method of adding a virtual machine back which involves using the Virtual Media Manager, and finally, we will present the second method of adding a virtual machine back by using the “Add” option. We will also note some important considerations that you should take into account before proceeding with these operations, such as saving the state of the virtual machine and backing up your virtual machine. By the end of this guide, you will have a clear understanding of how to manage your virtual machines in VirtualBox without losing any important data.
To temporarily remove a virtual machine from VirtualBox without deleting any files:
Method 1
- Open VirtualBox
- Select the virtual machine you want to remove
- Click on the “Machine” menu and select “Close” and then choose “Save the machine state”
Method 2
To temporarily remove a virtual machine from VirtualBox without deleting any files:
- Open VirtualBox
- Right-click on the virtual machine you want to remove

- Select “Remove”
- On the next window, choose “Remove only”
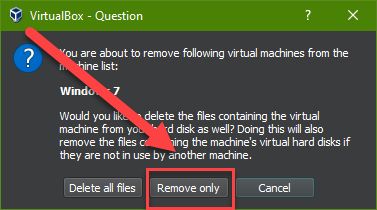
- Click “OK”
This will remove the virtual machine from the VirtualBox Manager, but will keep all of its associated files intact, allowing you to add it back later. Please note that if the virtual machine was running, you may need to save the machine state before removing it to ensure that the machine’s state is saved. Also, ensure to backup your virtual machine before proceeding with this operation.
This will close the virtual machine and save its state, but will not delete any files associated with the virtual machine. The virtual machine will no longer be visible in the VirtualBox Manager.
To add a temporarily removed virtual machine back to VirtualBox:
Method 1
- Open VirtualBox
- Click on the “File” menu and select “Virtual Media Manager”
- Select the virtual machine you want to add back and click on the “Add” button
- The virtual machine will now be visible in the VirtualBox Manager and can be started using the “Start” button.
Alternatively, you can also start the virtual machine from the command line using the “VBoxManage startvm” command followed by the name or UUID of the virtual machine. Note that the command line option is for an advanced user.
Method 2
To add a temporarily removed virtual machine back to VirtualBox:
- Open VirtualBox
- Click on the “Machine” menu and select “Add”
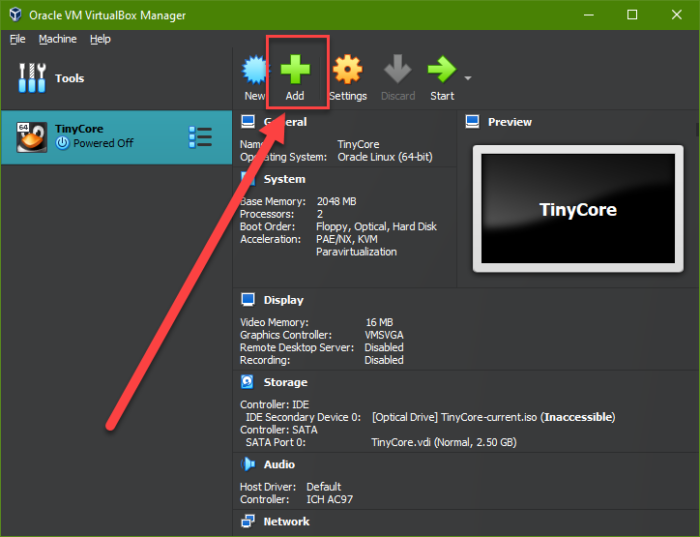
- Look for the directory where the virtual machine’s files are stored and click on the “Open” button

- The virtual machine will now be visible in the VirtualBox Manager and can be started using the “Start” button.
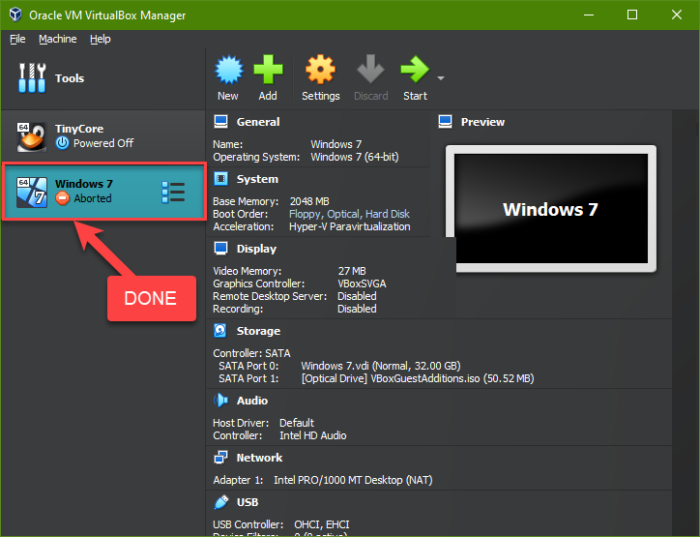
Please note that this method assumes that the virtual machine files are still present in the directory where they were originally stored and that the virtual machine was saved in a powered-off state. If the files have been deleted or moved, you will have to locate them before proceeding with the above steps.
Important Considerations
- A. Saving the state of virtual machines before removing
- B. Backing up virtual machines before proceeding with any operations
- C. Understanding that the command line option is for advanced users”
When it comes to managing virtual machines in VirtualBox, it’s important to take certain precautions to ensure that your virtual machines and their associated files remain intact. In this guide, we’ve provided you with two different methods for removing virtual machines and two methods for adding them back, as well as a video tutorial for visual learners. However, before proceeding with any of these operations, it’s important to consider a few important considerations to ensure that your virtual machines are safe and that you don’t lose any important data.
A. Saving the state of virtual machines before removing:
When you remove a virtual machine from VirtualBox, the virtual machine’s state is not saved automatically. This means that if the virtual machine was running, any unsaved data or changes will be lost when the virtual machine is removed. To avoid this, it’s important to save the state of the virtual machine before removing it. To do this, you can go to the “Machine” menu and select “Close”, then choose “Save the machine state”. This will close the virtual machine and save its state, so that when you add the virtual machine back, you can continue from where you left off.
B. Backing up virtual machines before proceeding with any operations:
Virtual machines and their associated files can take up a lot of storage space and can be quite complex. It’s important to backup your virtual machines before proceeding with any operations such as removing or adding them. This will ensure that if anything goes wrong, you’ll have a backup copy of your virtual machines to restore from. You can backup virtual machines by creating a snapshot of the virtual machine’s state or by exporting the virtual machine to an OVA file.
C. Understanding that the command line option is for advanced users:
In this guide, we’ve provided you with a method for starting a virtual machine from the command line using the “VBoxManage startvm” command. This method is for advanced users who are comfortable working with the command line. If you’re not familiar with the command line or don’t feel comfortable using it, it’s best to stick with the methods provided in this guide that involve using the VirtualBox Manager GUI.
Conclusion
In this guide, we’ve provided you with a comprehensive overview of how to temporarily remove and add virtual machines in VirtualBox without deleting any files. VirtualBox is a powerful and versatile virtualization software that allows users to run multiple operating systems on a single physical machine, but managing virtual machines can be a hassle, especially if you have a lot of them.
To start, we provided you with two different methods for removing virtual machines. The first method involves closing the virtual machine and saving its state, while the second method uses the “Remove” option. Both methods allow you to remove a virtual machine from the VirtualBox Manager without deleting any files associated with the virtual machine. This means that you can add the virtual machine back at a later time and continue from where you left off.
Next, we provided you with two methods for adding a temporarily removed virtual machine back to VirtualBox. The first method involves using the Virtual Media Manager, while the second method uses the “Add” option. Both methods allow you to add a virtual machine back to the VirtualBox Manager and start it using the “Start” button.
We also included a video tutorial for visual learners who prefer to see the steps in action. The tutorial demonstrates both methods for removing and adding virtual machines and provides step-by-step instructions to make it easy to follow.
Additionally, we highlighted some important considerations that you should take into account before proceeding with these operations, such as saving the state of the virtual machine and backing up your virtual machine.
To sum up, by the end of this guide, you should have a clear understanding of how to manage your virtual machines in VirtualBox without losing any important data. We encourage you to try the methods outlined in this guide and refer to the video tutorial for assistance. With these methods, you will be able to manage your virtual machines with ease and confidence.
Video Tutorial
In this guide, we’ve provided a video tutorial as an additional resource for visual learners. This tutorial takes you through both methods of removing and adding virtual machines in VirtualBox, with step-by-step instructions to make it easy to follow along.
The tutorial begins by demonstrating the first method of removing a virtual machine, which involves closing the virtual machine and saving its state. It then shows the second method, which uses the “Remove” option to remove the virtual machine from the VirtualBox Manager without deleting any associated files. This means that you can add the virtual machine back later and pick up where you left off.
Next, the tutorial goes on to show the first method for adding a virtual machine back to VirtualBox, which involves using the Virtual Media Manager, and the second method, which uses the “Add” option. Both methods allow you to add the virtual machine back to the VirtualBox Manager and start it using the “Start” button.
Throughout the tutorial, we’ve also included tips and recommendations for best practices when working with virtual machines in VirtualBox, as well as important considerations such as saving the state of the virtual machine and backing it up before proceeding with any operations.
Overall, the video tutorial is a great resource for anyone looking to temporarily remove and add virtual machines in VirtualBox without deleting any files. It provides a visual demonstration of the steps and makes it easy to follow along with step-by-step instructions.