How To Install Windows 11
How To Install Windows 11
This tutorial will guide you on how to install Windows 11 on your computer or laptop using Oracle VM VirtualBox. I will demonstrate the installation process using Oracle VM VirtualBox and provide instructions for both installation methods: via update and bootable ISO.
By following the steps I have provided, you will be able to successfully install Windows 11 on your device using Oracle VM VirtualBox.
Windows 11 Minimum system requirements
The following are the minimum system requirements for Windows 11:
- Processor: A 64-bit compatible processor or System on a Chip (SoC) with 2 or more cores, and a clock speed of at least 1 gigahertz (GHz).
- Memory: At least 4 gigabytes (GB) of RAM.
- Storage: A storage device with a capacity of 64 GB or higher.
- System firmware: The system should be capable of using UEFI and Secure Boot.
- TPM: The system should have a Trusted Platform Module (TPM) version 2.0.
- Graphics card: The system should have a graphics card that is compatible with DirectX 12 and WDDM 2.x.
- Display: The system should have a display that is at least 9 inches in size and has a resolution of at least 720p (high definition).
- Internet connection: The system should have an internet connection, and a Microsoft account is required for setup if using Windows 11 Home.
Updating Windows 10 To Windows 11
If you are interested in updating your Windows 10 operating system to Windows 11, Microsoft recommends that you wait until the upgrade becomes available through Windows update for your PC. However, if you prefer to upgrade right away, you can follow the steps outlined below.
First, check if your device meets the minimum system requirements for Windows 11 by using the PC Health Check App before proceeding with the installation. You should also review the Windows release information status for any known issues that may affect your device.
To upgrade from Windows 10 to Windows 11, visit the Microsoft website at https://www.microsoft.com/en-us/software-download/windows11 and click on “Download Now.” Then, open the installer and agree to the license terms to start the installation process. Wait for the installation assistant to finish downloading and installing, then restart your computer. Once your computer restarts, it will upgrade to Windows 11.
How to Get Windows 11 Right Now
Love it or hate it, Windows 11 is here and Microsoft is slowly rolling out its new operating system to its users. Today, I’m going to show you two ways to get Windows 11 right now:
- Wait for an update from Microsoft to roll out through its Windows Update. However, Microsoft has said that it will slowly roll out this update to users throughout the next few months. If you’re impatient and want it right now, then follow the second method.
- Download Windows 11 directly from Microsoft’s website or create a bootable USB.
Checking Your PC Compatibility with Windows 11
Before downloading Windows 11, you want to make sure that your machine is compatible with the new OS. The two main requirements are that you have a TPM 2.0 chip on your motherboard and that Secure Boot is enabled on your machine. Microsoft has required PC manufacturers to include these options on all new computers since July of 2016. However, many users have reported that these options are disabled, thus keeping them from upgrading to Windows 11. Here are the steps to check Windows 11 compatibility on your machine:
- Go to your favorite web browser and type in www.microsoft.com/en-us/software-downloads/windows11.
- Click on the link to download Microsoft’s PC Health Check tool.
- On the next page, click “Download PC Health Check app”.
- Navigate to where you downloaded the app and double-click to run it.
- Agree to the license agreement and click “Install”.
- Let it do its thing for just a few seconds, then click “Finish”.
- The app will launch immediately. Click on the blue “Check Now” button.
If it shows that TPM 2.0 and/or Secure Boot isn’t enabled, check out a video that walks you through how to enable these options. If you have green check marks and your computer is ready for Windows 11, then we can continue to update your machine to Windows 11.
Method 1: Downloading Windows 11 Directly from Microsoft’s Website
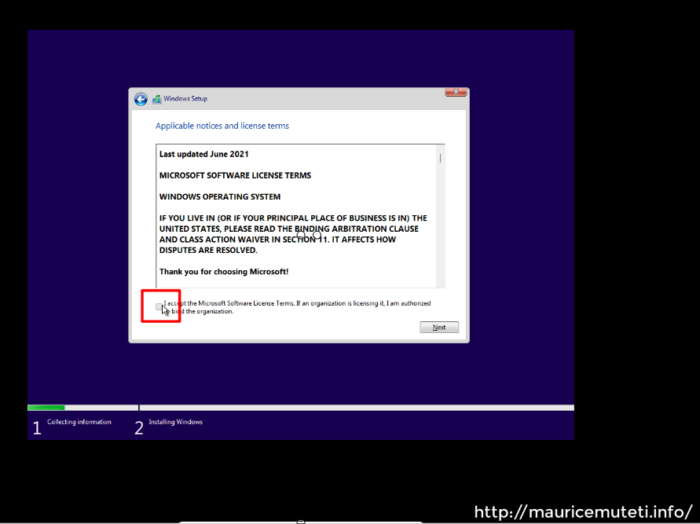
Start by visiting the Windows 11 download page. Scroll all the way down to the Windows 11 Installation Assistant and click the blue “Download now” button. Find the downloaded file and launch it to start the install. Click the “Accept and Install” button. The installer will do the following three steps on its own without you needing to do anything:
- Download Windows 11
- Verify the download
- Install Windows 11
During this time, you can use your computer and let this run in the background. It takes about 30 minutes to an hour or longer depending on your internet speed and your computer’s processing power. Once it’s installed, your PC will automatically restart in 30 minutes, or you can simply click the “Restart now” button to advance. Your computer will update and restart a few times as it finalizes the Windows 11 installation. You’ll be greeted with the new Windows 11 login screen. Go ahead and log in back into your machine. Windows will do one final setup and once it’s complete, it will take you to the Windows 11 desktop, where you can start exploring the new features and interface. Keep in mind that some of your previous settings, apps, and files may not transfer over to the new operating system, so make sure to back up any important data beforehand. Additionally, if you encounter any issues or compatibility problems with Windows 11, you can always roll back to your previous version of Windows within the first 10 days of upgrading. Overall, upgrading to Windows 11 can bring some exciting new changes and improvements to your computing experience, but it’s important to make sure your device meets the necessary requirements and to proceed with caution during the installation process.
Method 2: Creating a Bootable USB to Install Windows 11
If you prefer to create a bootable USB to install Windows 11, here are the steps:
- Start by visiting the Windows 11 download page. Scroll down to “Create Windows 11 installation media” and click “Download now”.
- Once it downloads, insert a USB drive into your computer with at least 8GB of space.
- Launch the downloaded file and follow the prompts to create the bootable USB drive.
- After the bootable USB is created, restart your computer and boot from the USB drive. This will vary depending on your computer’s manufacturer, so consult your manual or do a quick search online to find out how to boot from a USB on your specific machine.
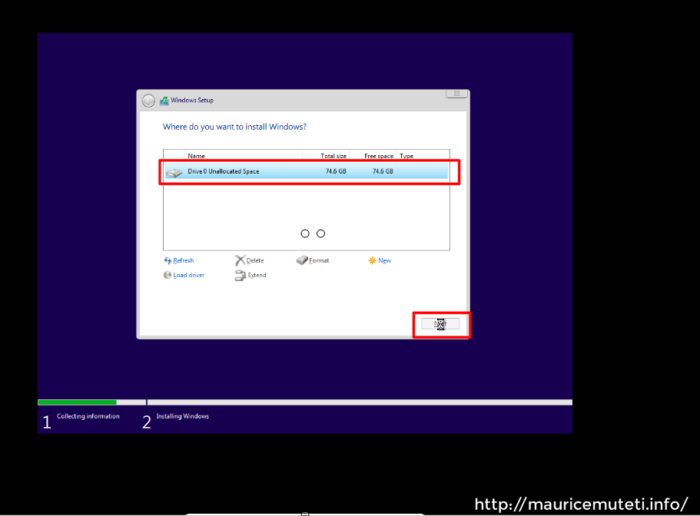
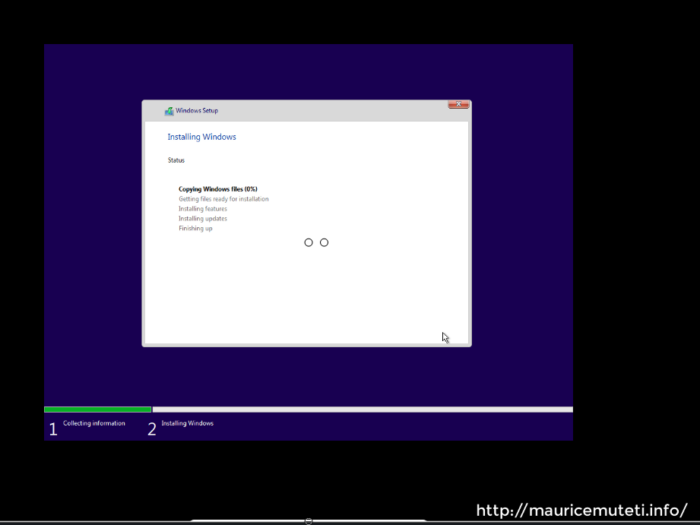
- Once you’ve booted from the USB, follow the prompts to install Windows 11. The process is similar to Method 1 above.
Once the installation is complete, you’ll be asked to set up your computer as if it were brand new. You can either sign in with your Microsoft account or create a local account. After that, you’ll be taken to the new Windows 11 desktop and you can start using your computer.
Conclusion
Windows 11 is the latest operating system from Microsoft, and it brings a new, modern look and feel to your computer. If you’re excited to try it out, you can follow one of the methods outlined in this article to get it installed on your machine. Just make sure to check that your computer is compatible with Windows 11 before downloading or installing it.
STEP 1

STEP 2

STEP 3

STEP 4

STEP 5

STEP 6

STEP 7

STEP 8

STEP 9

STEP 10

STEP 11

STEP 12

STEP 13

STEP 14

STEP 15

STEP 16

STEP 17

STEP 18

STEP 19

STEP 20

STEP 21

STEP 22

STEP 23

STEP 24

STEP 25

STEP 26

STEP 27

STEP 28

STEP 29

STEP 30

STEP 31

STEP 32

STEP 33

STEP 34

STEP 35

STEP 36

STEP 37

STEP 38

STEP 39

STEP 40

STEP 41

STEP 42

STEP 43

STEP 44

STEP 45

STEP 46

