How To Connect To Access Database And Display Data And Images In Datagridview In C Sharp Windows Application
How To Connect To Access Database And Display Data And Images In Datagridview In C# Windows Application

Table of contents :
- HOW TO CREATE MICROSOFT ACCESS DATABASE AND TABLE
- MS ACCESS DATABASE STRUCTURE.
- HOW TO ADD MS ACCESS DATABASE TO VISUAL STUDIO 2010 (.ACCDB FILE)
- HOW TO CONNECT TO MICROSOFT ACCESS DATABASE.
- HOW TO INSERT DATA AND IMAGES INTO MICROSOFT ACCESS DATABASE.
- HOW TO DISPLAY DATA AND IMAGES IN DATAGRIDVIEW FROM MICROSOFT ACCESS ON FORM LOAD.
- HOW TO UPDATE SELECTED DATAGRIDVIEW ROW WITH TEXTBOX AND PICTURE BOX USING C#
- HOW TO DELETE SELECTED ROWS FROM DATAGRIDVIEW AND MICROSOFT ACCESS DATABASE IN C# VISUAL STUDIO
- HOW TO CONVERT IMAGE TO BYTE ARRAY.
- HOW TO CONVERT BYTE ARRAY TO IMAGE.
- HOW TO CHOOSE IMAGE FROM COMPUTER AND DISPLAY IT ON PICTUREBOX.
- HOW TO DISPLAY SELECTED ROW FROM DATAGRIDVIEW TO TEXTBOXES IN IN C# WINDOW APPLICATION ON CELL CLICK.
- HOW TO DISPLAY SELECTED ROW FROM DATAGRIDVIEW TO PICTUREBOX IN C# WINDOW APPLICATION ON CELL CLICK.
- HOW TO CLEAR INPUT FIELDS, TEXT BOXES AND PICTURE BOX.
- HOW TO ADD MICROSOFT.OFFICE.INTEROP.EXCEL REFERENCE IN VISUAL STUDIO 2010.
- HOW TO IMPORT EXCEL FILE TO DATAGRIDVIEW IN C# WINDOWS APPLICATION.
- HOW TO EXPORT DATAGRIDVIEW TO EXCEL FILE IN C# WINDOWS APPLICATION.
- HOW TO PRINT DATAGRIDVIEW IN C# WINDOWS APPLICATION.
- HOW TO CLEAR DATAGRIDVIEW IN C# WINDOWS APPLICATION.
- HOW TO REFRESH DATAGRIDVIEW IN C# WINDOWS APPLICATION.
- HOW TO SHOW DATAGRIDVIEW SELECTED ROW DATA IN ANOTHER FORM USING C#
- HOW TO SHOW DATAGRIDVIEW SELECTED ROWS TO ANOTHER FORMS DATAGRIDVIEW USING C#
- HOW TO CONNECT TO MS ACCESS DATABASE INSERT UPDATE DELETE CLEAR PRINT EXPORT IMPORT EXCEL DISPLAY IN DATAGRIDVIEW IN C# WINDOWS APPLICATION (DEMO VIDEO)
- COMPLETE VIDEO TUTORIAL
This Tutorial Shows How To Connect To Access Database And Display Data And Images In Datagridview In C Sharp Windows Application. This C# application inserts data entered by user to ms access database. Also the images loaded from pc and displayed on picturebox are inserted in to the database as byte array. Then images are first converted to byte arrays before being stored in access database. The first database column is of type integer which increments automatically whenever you insert a new row.
Go to start menu and search “Microsoft Access”. Then select it from the list.

Click On Blank Database

A New Database and table named “Database2” and “Table1” Gets created.

Right click on table name and select design view.

Add Field names like ( FullName,EmailAddress,PhoneNumberP,LanguageP, CountryP,GenderP,ImagePath, ImageFile etc.) and Datatypes.

The newly created database is saved in documents folder unless you specified a different directory when creating the database.

VIDEO TUTORIAL
The database has the following fields, FullName,EmailAddress,PhoneNumberP,LanguageP, CountryP,GenderP,ImagePath, ImageFile. All of them are of datatype text except imagefile. The imagefile is of type Ole Object , Which comes in handy for files.(Images, Pdf, etc).

VIDEO TUTORIAL
On tools menu, Select Connect To Database.

In data source section “Microsoft Access Database File (OLE DB)” is selected by default.

Choose Browse next to Database file name, and then navigate to your .accdb file and choose Open.

Browse the file name. This is the location where your database is stored. i.e. – (C:\Users\Authentic\Documents\Database1.accdb).
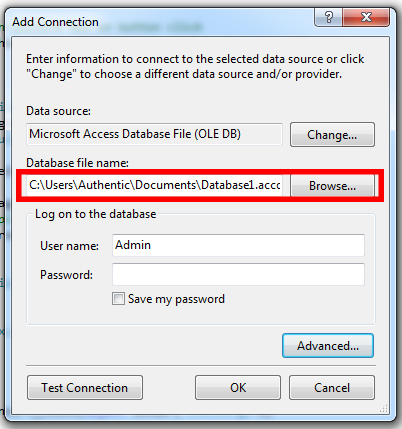
Click Test Connection To Test Connection to the database.

If the connection is successful click Ok on the message box.

If You want to get database connection string and other database properties go to “Advanced”.

This is the connection string you will use programmatically to connect to ms access database.

Now go to server explorer window and you will see the newly added database.

VIDEO TUTORIAL
Connection is initialized in form1 Constructor.
CODE SNIPPET C#
        OleDbConnection accessDatabaseConnection = null;
        //MS Access Database Connection String
        string connectionSttring = @"Provider=Microsoft.ACE.OLEDB.12.0;Data Source=C:\Users\Authentic\Documents\Database1.accdb";
        public Form1()
        {
            //Initializing MS Access Database Connection
            accessDatabaseConnection = new OleDbConnection(connectionSttring);
            InitializeComponent();
        }
VIDEO TUTORIAL

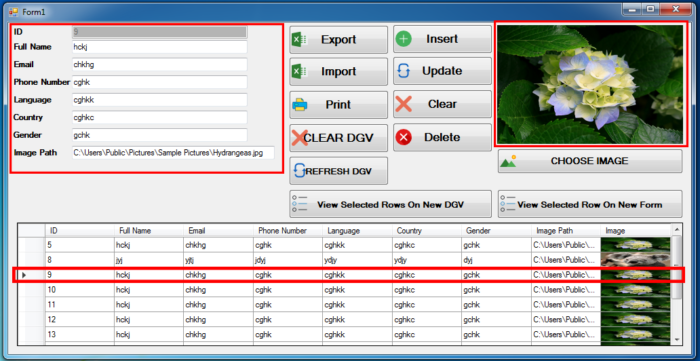
When the data is inserted you get a dialog box informing you that the data has been added to ms-access database successfully.

When you click OK button on the message box, the box closes and datagridview refreshes with a new inserted row at the bottom.

The data reflects in ms access database instantly.

All fields are inserted to ms access database at once when you click insert button. The image from picturebox is added to the database as byte array. The Id Column, Which is the first one, Is Auto Incremented whenever you insert a new row to the database.
CODE SNIPPET C#
        //Inserting data into microsoft access database and datagridview
        private void btnInsert_Click(object sender, EventArgs e)
        {
            try
            {
                //Check If One Or More Fields Are Empty
                if (txtFullName.Text == String.Empty || txtEmail.Text == String.Empty || txtPhoneNumber.Text == String.Empty || txtLanguage.Text == String.Empty || txtCountry.Text == String.Empty || txtGender.Text == String.Empty || txtImagePath.Text == String.Empty || pictureBox1.Image == null)
                {
                    MessageBox.Show("One Or More Empty Field MAke sure all fields are filled............");
                }
                else
                {
                    OleDbCommand insertDataIntoMSAccessDataBaseOleDbCommand = new OleDbCommand(insertQuery, accessDatabaseConnection);
                    insertDataIntoMSAccessDataBaseOleDbCommand.Parameters.AddWithValue("@FullName", OleDbType.VarChar).Value = txtFullName.Text;
                    insertDataIntoMSAccessDataBaseOleDbCommand.Parameters.AddWithValue("@EmailAddress", OleDbType.VarChar).Value = txtEmail.Text;
                    insertDataIntoMSAccessDataBaseOleDbCommand.Parameters.AddWithValue("@PhoneNumberP", OleDbType.VarChar).Value = txtPhoneNumber.Text;
                    insertDataIntoMSAccessDataBaseOleDbCommand.Parameters.AddWithValue("@LanguageP", OleDbType.VarChar).Value = txtLanguage.Text;
                    insertDataIntoMSAccessDataBaseOleDbCommand.Parameters.AddWithValue("@CountryP", OleDbType.VarChar).Value = txtCountry.Text;
                    insertDataIntoMSAccessDataBaseOleDbCommand.Parameters.AddWithValue("@GenderP", OleDbType.VarChar).Value = txtGender.Text;
                    insertDataIntoMSAccessDataBaseOleDbCommand.Parameters.AddWithValue("@ImagePath", OleDbType.VarChar).Value = txtImagePath.Text;
                    insertDataIntoMSAccessDataBaseOleDbCommand.Parameters.AddWithValue("@ImageFile", OleDbType.Binary).Value = convertImageToByteArray(pictureBox1.Image);
                    //Opening Access Database Connection
                    accessDatabaseConnection.Open();
                    int insertDataToAccessDatabase = insertDataIntoMSAccessDataBaseOleDbCommand.ExecuteNonQuery();
                    //If data Has been inserted to the database output the following message
                    if (insertDataToAccessDatabase > 0)
                    {
                        MessageBox.Show("Data Inserted To MS-Access Database Susccessfully.........");
                    }
                }

            }
            catch (Exception ex)
            {
                MessageBox.Show(ex.StackTrace);
            }
            finally
            {
                //Finally Close MS Access Database Connection
                if (accessDatabaseConnection != null)
                {
                    accessDatabaseConnection.Close();
                }
            }
            //Refreshing Datagridview after inserting new row
            populateDataGridView();
            //Clear Input Fields PictureBox And Textboxes
            clearInputFields();
        }
VIDEO TUTORIAL

All rows form ms-access database are displayed in datagridview when you run the application. The first row which is (ID) is not displayed. Image row is the last one. It displays images which are converted(cast) explicitly to byte array. The Code runs inside form load event.
CODE SNIPPET C#
        //Function for retrieving data from ms access database and displaying it on DataGridView
        public void populateDataGridView()
        {
            //First, clear all rows before populating datagridview with data from MS Access Database. Check if datagridview rows are empty before clearing.
            if (dataGridView1.Rows.Count > 0)
            {
                dataGridView1.Rows.Clear();
            }

            try
            {
                accessDatabaseConnection.Open();
                //OleDbDataAdapter adapter = new OleDbDataAdapter(sqlQuery, acceddDatabaseConnection);
                OleDbCommand command = new OleDbCommand(selectDataFromMSAccessDatabaseQuery, accessDatabaseConnection);
                OleDbDataReader reader = command.ExecuteReader();

                while (reader.Read())
                {
                    //Console.WriteLine(reader[8].GetType());
                    dataGridView1.Rows.Add(reader[0].ToString(), reader[1].ToString(), reader[2].ToString(), reader[3].ToString(), reader[4].ToString(), reader[5].ToString(), reader[6].ToString(), reader[7].ToString(), (byte[])reader[8]);
                }

                reader.Close();
            }
            catch (Exception ex)
            {
                MessageBox.Show(ex.StackTrace);
            }
            finally
            {
                //Finally Close MS Access Database Connection
                if (accessDatabaseConnection != null)
                {
                    accessDatabaseConnection.Close();
                }


            }
        }
VIDEO TUTORIAL

The data is updated based on the selected datagridview row ID. To use update feature click on datagridview row, And the input fields gets filled with selected datagridview row data. Then change few fields and click update button.
CODE SNIPPET C#
        //Update data in microsoft access database and datagridview
        private void button1_Click(object sender, EventArgs e)
        {
            if (txtID.Text == String.Empty)
            {
                MessageBox.Show("First Click On DatagridView Row Cell Or Make Sure ID Field Is Not Empty.......");
            }
            else
            {
                try
                {
                    //Check If One Or More Fields Are Empty
                    if (txtFullName.Text == String.Empty || txtEmail.Text == String.Empty || txtPhoneNumber.Text == String.Empty || txtLanguage.Text == String.Empty || txtCountry.Text == String.Empty || txtGender.Text == String.Empty || txtImagePath.Text == String.Empty || pictureBox1.Image == null)
                    {
                        MessageBox.Show("One Or More Empty Field Make sure all fields are filled............");
                    }
                    else
                    {
                        OleDbCommand updateDataInMSAccessDatabaseOleDbCommand = new OleDbCommand(updateDataInMSAccessDatabaseQuery, accessDatabaseConnection);
                        updateDataInMSAccessDatabaseOleDbCommand.Parameters.AddWithValue("@FullName", OleDbType.VarChar).Value = txtFullName.Text;
                        updateDataInMSAccessDatabaseOleDbCommand.Parameters.AddWithValue("@EmailAddress", OleDbType.VarChar).Value = txtEmail.Text;
                        updateDataInMSAccessDatabaseOleDbCommand.Parameters.AddWithValue("@PhoneNumberP", OleDbType.VarChar).Value = txtPhoneNumber.Text;
                        updateDataInMSAccessDatabaseOleDbCommand.Parameters.AddWithValue("@LanguageP", OleDbType.VarChar).Value = txtLanguage.Text;
                        updateDataInMSAccessDatabaseOleDbCommand.Parameters.AddWithValue("@CountryP", OleDbType.VarChar).Value = txtCountry.Text;
                        updateDataInMSAccessDatabaseOleDbCommand.Parameters.AddWithValue("@GenderP", OleDbType.VarChar).Value = txtGender.Text;
                        updateDataInMSAccessDatabaseOleDbCommand.Parameters.AddWithValue("@ImagePath", OleDbType.VarChar).Value = txtImagePath.Text;
                        updateDataInMSAccessDatabaseOleDbCommand.Parameters.AddWithValue("@ImageFile", OleDbType.Binary).Value = convertImageToByteArray(pictureBox1.Image);
                        updateDataInMSAccessDatabaseOleDbCommand.Parameters.AddWithValue("@ID", OleDbType.Integer).Value = Convert.ToInt32(txtID.Text);
                        //Opening Access Database Connection
                        accessDatabaseConnection.Open();
                        int insertDataToAccessDatabase = updateDataInMSAccessDatabaseOleDbCommand.ExecuteNonQuery();
                        //If data Has been inserted to the database output the following message
                        if (insertDataToAccessDatabase > 0)
                        {
                            MessageBox.Show("Data Updated In MS-Access Database Susccessfully.........");
                            //Clear Input fields After Deleting the Data From MS Access Database
                            clearInputFields();
                        }
                    }

                }
                catch (Exception ex)
                {
                    MessageBox.Show(ex.StackTrace);
                }
                finally
                {
                    //Finally Close MS Access Database Connection
                    if (accessDatabaseConnection != null)
                    {
                        accessDatabaseConnection.Close();
                    }
                }
                //Refreshing Datagridview after Updating a row
                populateDataGridView();
            }

        }
VIDEO TUTORIAL

Then a Message Box Appears showing that the selected row has been deleted successfully.

The Row Gets deleted when you click Delete button. This removes selected row from both MS Access Database and Datagridview.
CODE SNIPPET C#
        //Delete From Microsoft access Database
        private void btnDelete_Click(object sender, EventArgs e)
        {
            if (txtID.Text == String.Empty)
            {
                MessageBox.Show("First Click On DatagridView Row Cell Or Make Sure ID Field Is Not Empty.......");
            }
            else
            {
                try
                {
                    OleDbCommand deleteDataFromMSAccessDatabaseOleDbCommand = new OleDbCommand(deleteDataFromMSAccessDatabaseQuery, accessDatabaseConnection);
                    deleteDataFromMSAccessDatabaseOleDbCommand.Parameters.AddWithValue("@ID", OleDbType.Integer).Value = Convert.ToInt32(txtID.Text);
                    //Opening Access Database Connection
                    accessDatabaseConnection.Open();
                    int deleteDataFromMSAccessDatabase = deleteDataFromMSAccessDatabaseOleDbCommand.ExecuteNonQuery();
                    //If data Has been Deleted from the database output the following message
                    if (deleteDataFromMSAccessDatabase > 0)
                    {
                        MessageBox.Show("Data Deleted From MS-Access Database Susccessfully.........");
                        //Clear Input fields After Deleting the Data From MS Access Database
                        clearInputFields();
                    }


                }
                catch (Exception ex)
                {
                    MessageBox.Show(ex.StackTrace);
                }
                finally
                {
                    //Finally Close MS Access Database Connection
                    if (accessDatabaseConnection != null)
                    {
                        accessDatabaseConnection.Close();
                    }
                }
                //Refreshing Datagridview after Deleting a row
                populateDataGridView();
            }
        }
VIDEO TUTORIAL
Images from picturebox are converted to byte array before being inserted to ms access database.
CODE SNIPPET C#
        //Function For Converting Image To Byte Array
        public byte[] convertImageToByteArray(Image img)
        {
            MemoryStream ms = new MemoryStream();
            img.Save(ms, img.RawFormat);
            return ms.ToArray();
        }
VIDEO TUTORIAL
CONVERTING BYTE ARRAY TO IMAGE
Images are converted from byte array to Image before displaying them on picturebox from ms-access database.
CODE SNIPPET C#
        //Function for Converting Byte Array To Image
        public Image convertByteArrayToImage(byte[] img)
        {
            MemoryStream ms = new MemoryStream(img);

            return Image.FromStream(ms);

        }
VIDEO TUTORIAL

When you click choose image button the Dialog open giving you an option to choose image from your computer. When you choose image and click open button the image is displayed on PictureBox ready to be inserted into the database. Also full image path is displayed in the appropriate TextBox.
CODE SNIPPET C#
        //Display image on picture box on button click
        private void btnChooseImage_Click(object sender, EventArgs e)
        {
            OpenFileDialog chooseImage = new OpenFileDialog();
            chooseImage.Title = "Choose Image";
            DialogResult chooseImageDialog = chooseImage.ShowDialog();

            if (chooseImageDialog == DialogResult.OK)
            {
                txtImagePath.Text = chooseImage.FileName;
                //Displaying image from Pc On PictureBox
                pictureBox1.Image = Image.FromFile(chooseImage.FileName);
            }
        }
VIDEO TUTORIAL
Each Cell content From a specific row get assigned to appropriate textbox.Text Value when you click on datagridview cell.
CODE SNIPPET C#
        private void dataGridView1_CellContentClick(object sender, DataGridViewCellEventArgs e)
        {
            //Check if the row cell content is clicked
            if (e.RowIndex >= 0)
            {
                DataGridViewRow datagridviewrow = dataGridView1.Rows[e.RowIndex];
                //Assigning Textboxes and picturebox with values
                txtID.Text = datagridviewrow.Cells[0].Value.ToString();
                txtFullName.Text = datagridviewrow.Cells[1].Value.ToString();
                txtEmail.Text = datagridviewrow.Cells[2].Value.ToString();
                txtPhoneNumber.Text = datagridviewrow.Cells[3].Value.ToString();
                txtLanguage.Text = datagridviewrow.Cells[4].Value.ToString();
                txtCountry.Text = datagridviewrow.Cells[5].Value.ToString();
                txtGender.Text = datagridviewrow.Cells[6].Value.ToString();
                txtImagePath.Text = datagridviewrow.Cells[7].Value.ToString();
                //First cast image from datagridview cell to byte[] and then convert it from byte array to Image then finnaly display it on picturebox.
                pictureBox1.Image = convertByteArrayToImage((byte[])datagridviewrow.Cells[8].Value);
            }
        }
VIDEO TUTORIAL
First i had to cast the image from datagridview cell to byte array and then converted it to Image and finally assigned it to picturebox.Image Value.
CODE SNIPPET C#
        private void dataGridView1_CellContentClick(object sender, DataGridViewCellEventArgs e)
        {
            //Check if the row cell content is clicked
            if (e.RowIndex >= 0)
            {
                DataGridViewRow datagridviewrow = dataGridView1.Rows[e.RowIndex];

                //First cast image from datagridview cell to byte[] and then convert it from byte array to Image then finnaly display it on picturebox.
                pictureBox1.Image = convertByteArrayToImage((byte[])datagridviewrow.Cells[8].Value);
            }
        }
VIDEO TUTORIAL

All input fields(textboxes, picturebox) gets cleared when you click Clear button.
CODE SNIPPET C#
        public void clearInputFields()
        {
            //Clearing Textfields
            txtID.Text = String.Empty;
            txtFullName.Text = String.Empty;
            txtEmail.Text = String.Empty;
            txtPhoneNumber.Text = String.Empty;
            txtLanguage.Text = String.Empty;
            txtCountry.Text = String.Empty;
            txtGender.Text = String.Empty;
            txtImagePath.Text = String.Empty;
            //Clearing pictureBox
            pictureBox1.Image = null;
        }

        private void btnClear_Click(object sender, EventArgs e)
        {
            clearInputFields()
        }
VIDEO TUTORIAL
Right-click on “References” and select “Add Reference”.

Select the “.NET” tab.

Look for Microsoft.Office.Interop.Excel. Select it.
Click Ok.
VIDEO TUTORIAL


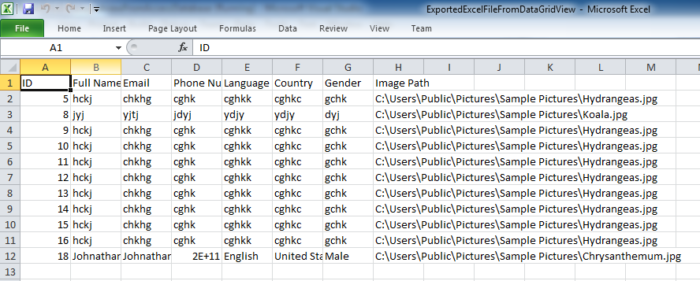
The data is exported to excel file when you click export button, Also The dialog box appears prompting you to enter excel file name and select save location.
CODE SNIPPET C#
        //Exporting DataGridView To Excel
        private void btnExportDataGridViewToExcel_Click(object sender, EventArgs e)
        {
            try
            {
                Microsoft.Office.Interop.Excel._Application exportDataGridViewToExcelApplication = new Microsoft.Office.Interop.Excel.Application();
                Microsoft.Office.Interop.Excel._Workbook exportDataGridViewToExcelWorkbook = exportDataGridViewToExcelApplication.Workbooks.Add(Type.Missing);
                Microsoft.Office.Interop.Excel._Worksheet exportDataGridViewToExcelWorksheet = null;
                exportDataGridViewToExcelApplication.Visible = true;
                exportDataGridViewToExcelWorksheet = exportDataGridViewToExcelWorkbook.Sheets["Sheet1"];
                exportDataGridViewToExcelWorksheet = exportDataGridViewToExcelWorkbook.ActiveSheet;
                exportDataGridViewToExcelWorksheet.Name = "ExportedExcelFromDataGridView";

                try
                {
                    for (int i = 0; i < dataGridView1.Columns.Count - 1; i++)
                    {
                        exportDataGridViewToExcelWorksheet.Cells[1, i + 1] = dataGridView1.Columns[i].HeaderText;
                    }
                    for (int i = 0; i < dataGridView1.Rows.Count; i++)
                    {
                        for (int j = 0; j < dataGridView1.Columns.Count - 1; j++)
                        {
                            if (dataGridView1.Rows[i].Cells[j].Value != null)
                            {
                                exportDataGridViewToExcelWorksheet.Cells[i + 2, j + 1] = dataGridView1.Rows[i].Cells[j].Value.ToString();
                            }
                            else
                            {
                                exportDataGridViewToExcelWorksheet.Cells[i + 2, j + 1] = "";
                            }
                        }
                    }

                    //Dialog Box For Saving Excel File
                    SaveFileDialog exportDataGridViewToExcelSaveDialog = new SaveFileDialog();
                    //Dialog Box Title
                    exportDataGridViewToExcelSaveDialog.Title = "Save Excel File";
                    //Supported Excel File Extensions
                    exportDataGridViewToExcelSaveDialog.Filter = "Excel files (*.xlsx;*.xls;*.xlm)|*.xlsx;*.xls;*.xlm";
                    //Default Excel File Extension
                    exportDataGridViewToExcelSaveDialog.DefaultExt = ".xlsx";
                    //Excel File Name
                    exportDataGridViewToExcelSaveDialog.FileName = "ExportedExcelFileFromDataGridView";

                    if (exportDataGridViewToExcelSaveDialog.ShowDialog() == System.Windows.Forms.DialogResult.OK)
                    {
                        exportDataGridViewToExcelWorkbook.SaveAs(exportDataGridViewToExcelSaveDialog.FileName);
                        MessageBox.Show("DataGridView Exported To Excel File Successfully", "Success", MessageBoxButtons.OK, MessageBoxIcon.Information);
                    }
                }
                catch (System.Exception ex)
                {
                    MessageBox.Show(ex.Message);
                }

                finally
                {
                    //Release Resources
                    exportDataGridViewToExcelWorksheet = null;
                    exportDataGridViewToExcelWorkbook.Close();
                    exportDataGridViewToExcelApplication.Quit();

                }
            }
            catch (Exception ex)
            {
                MessageBox.Show(ex.Message.ToString());
            }
        }
VIDEO TUTORIAL

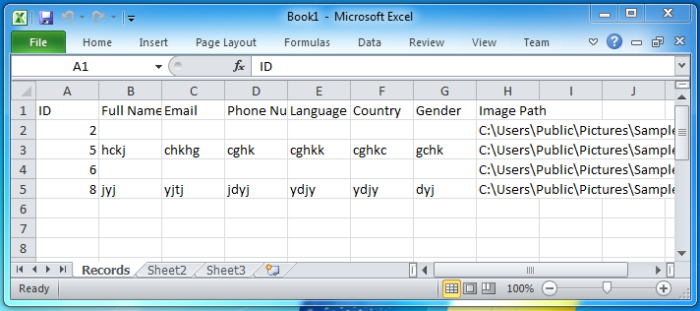
Excel File gets imported to datagridview when you click Import Button. You can clear datagridview rows before importing to see this feature in Action.
CODE SNIPPET C#
        //Import Data From Excel To DataGridView
        private void btnImportExcelToDataGridView_Click(object sender, EventArgs e)
        {
            Microsoft.Office.Interop.Excel.Application importExcelToDataGridViewApplication = new Microsoft.Office.Interop.Excel.Application();
            Range ShtRange;
            try
            {
                OpenFileDialog importExcelToDataGridViewOpenFileDialog = new OpenFileDialog();
                //Supported File Extensions
                importExcelToDataGridViewOpenFileDialog.Filter = "Choose Excel File|*.xls;*.xlsx;*.xlsm";
                //Dialog Title
                importExcelToDataGridViewOpenFileDialog.Title = "Select Excel File";
                DialogResult importExcelToDataGridViewDialogResult = importExcelToDataGridViewOpenFileDialog.ShowDialog();

                if (importExcelToDataGridViewDialogResult == DialogResult.OK)
                {
                    Microsoft.Office.Interop.Excel.Workbook importExcelToDataGridViewWorkbook = importExcelToDataGridViewApplication.Workbooks.Open(importExcelToDataGridViewOpenFileDialog.FileName);
                    Microsoft.Office.Interop.Excel.Worksheet importExcelToDataGridViewWorksheet = importExcelToDataGridViewWorkbook.ActiveSheet;
                    ShtRange = importExcelToDataGridViewWorksheet.UsedRange;
                    //Looping Through excel Cells
                    for (int Rnum = 2; Rnum <= ShtRange.Rows.Count; Rnum++)
                    {
                        //Getting Image From excel path cells
                        Image imageFromExcel = Image.FromFile(importExcelToDataGridViewWorksheet.Cells[Rnum, 8].Value);
                        //Converting Image To Byte Array
                        byte[] byteImageFromExcel = convertImageToByteArray(imageFromExcel);
                        //Populating DataGridView From Excel
                        dataGridView1.Rows.Add(importExcelToDataGridViewWorksheet.Cells[Rnum, 1].Value, importExcelToDataGridViewWorksheet.Cells[Rnum, 2].Value, importExcelToDataGridViewWorksheet.Cells[Rnum, 3].Value, importExcelToDataGridViewWorksheet.Cells[Rnum, 4].Value, importExcelToDataGridViewWorksheet.Cells[Rnum, 5].Value, importExcelToDataGridViewWorksheet.Cells[Rnum, 6].Value, importExcelToDataGridViewWorksheet.Cells[Rnum, 7].Value, importExcelToDataGridViewWorksheet.Cells[Rnum, 8].Value, byteImageFromExcel);
                        //for (int i = 0; i < ShtRange.Columns.Count ; i++)
                        //{
                        //    dataGridView1.Rows[Rnum].Cells[i].Value = importExcelToDataGridViewWorksheet.Cells[Rnum, i + 1].Value;
                        //}
                    }
                    //Release Resources
                    importExcelToDataGridViewWorkbook.Close();
                    importExcelToDataGridViewApplication.Quit();
                }

            }
            catch (Exception ex)
            {
                MessageBox.Show(ex.Message.ToString());
            }
            finally
            {

            }
        }
VIDEO TUTORIAL
To print DataGridView Drag PrintDocument from toolbox to your form application. As Show Below.


CODE SNIPPET C#
        private void printDocument1_PrintPage(object sender, System.Drawing.Printing.PrintPageEventArgs e)
        {
            Bitmap bm = new Bitmap(this.dataGridView1.Width, this.dataGridView1.Height);
            dataGridView1.DrawToBitmap(bm, new System.Drawing.Rectangle(0, 0, this.dataGridView1.Width, this.dataGridView1.Height));
            e.Graphics.DrawImage(bm, 0, 0);
        }

        private void btnPrintDataGridView_Click(object sender, EventArgs e)
        {
            //Open the print dialog
            PrintDialog printDialog = new PrintDialog();
            printDialog.Document = printDocument1;
            printDialog.UseEXDialog = true;
            //Print document
            if (DialogResult.OK == printDialog.ShowDialog())
            {
                //Document Name
                printDocument1.DocumentName = "Printing DataGridView";
                //Print Function
                printDocument1.Print();
                MessageBox.Show("Document Printed!!!.......");
            }
        }
VIDEO TUTORIAL

First am checking if the DataGridView rows are empty before clearing them.
CODE SNIPPET C#
        //Clearing DataGridView
        private void btnclearDataGridView_Click(object sender, EventArgs e)
        {
            //Checking if datagridview rows are empty before clearing data
            if (dataGridView1.Rows.Count > 0)
            {
                //Clear All Rows
                dataGridView1.Rows.Clear();
            }
            else
            {
                MessageBox.Show("DataGridView Is Empty.. ");
            }
        }
VIDEO TUTORIAL

Clearing rows from the datagridview doesn’t delete them from MS Access. Thus, Refreshing it restore cleared rows.
Refresh Feature calls populateDataGridView Function, which populates datagridview with data from MS Access Database.
CODE SNIPPET C#
        private void btnRefreshDataGridView_Click(object sender, EventArgs e)
        {
            populateDataGridView();
        }
VIDEO TUTORIAL


CODE SNIPPET C#
        //Show Datagridview Selected Row Data In Another Form
        private void btnViewSelectedRowOnNewForm_Click(object sender, EventArgs e)
        {

            // Make sure user selects at least 1 row
            if (dataGridView1.SelectedRows.Count == 1 && dataGridView1.Rows.Count > 0)
            {
                ShowDatagridviewSelectedRowDataInAnotherForm showDatagridviewSelectedRowDataInAnotherForm = new ShowDatagridviewSelectedRowDataInAnotherForm();
                showDatagridviewSelectedRowDataInAnotherForm.txtID.Text = dataGridView1.SelectedRows[0].Cells[0].Value.ToString();
                showDatagridviewSelectedRowDataInAnotherForm.txtFullName.Text = dataGridView1.SelectedRows[0].Cells[1].Value.ToString();
                showDatagridviewSelectedRowDataInAnotherForm.txtEmail.Text = dataGridView1.SelectedRows[0].Cells[2].Value.ToString();
                showDatagridviewSelectedRowDataInAnotherForm.txtPhoneNumber.Text = dataGridView1.SelectedRows[0].Cells[3].Value.ToString();
                showDatagridviewSelectedRowDataInAnotherForm.txtLanguage.Text = dataGridView1.SelectedRows[0].Cells[4].Value.ToString();
                showDatagridviewSelectedRowDataInAnotherForm.txtCountry.Text = dataGridView1.SelectedRows[0].Cells[5].Value.ToString();
                showDatagridviewSelectedRowDataInAnotherForm.txtGender.Text = dataGridView1.SelectedRows[0].Cells[6].Value.ToString();
                showDatagridviewSelectedRowDataInAnotherForm.txtImagePath.Text = dataGridView1.SelectedRows[0].Cells[7].Value.ToString();
                showDatagridviewSelectedRowDataInAnotherForm.pictureBox1.Image = convertByteArrayToImage((byte[])dataGridView1.SelectedRows[0].Cells[8].Value);
                //Show New Form With Data From Another forms datagridview selected row
                showDatagridviewSelectedRowDataInAnotherForm.ShowDialog();
            }
            else if (dataGridView1.Rows.Count == 0)
            {
                MessageBox.Show("DataGridView Is Empty......");
            }
            else if (dataGridView1.SelectedRows.Count == 0 && dataGridView1.Rows.Count > 0)
            {
                MessageBox.Show("DataGridView Has Data But There Is No Row Selected......");

            }
            else if (dataGridView1.SelectedRows.Count > 1)
            {
                MessageBox.Show("You Have Selected More Than One Row Please Select One Row Only......");

            }
            else
            {
                MessageBox.Show("Unknown Error Try Again......");
            }
        }
VIDEO TUTORIAL


CODE SNIPPET C#
        //Show Datagridview Selected Rows In Another Form Datagridview
        private void btnbtnViewSelectedRowOnNewDGV_Click(object sender, EventArgs e)
        {
            // Make sure user selects at least 1 row
            if (dataGridView1.SelectedRows.Count > 0 && dataGridView1.Rows.Count > 0)
            {
                ShowDatagridviewSelectedRowsInAnotherFormDatagrid showDatagridviewSelectedRowsDataInAnotherFormDatagridview = new ShowDatagridviewSelectedRowsInAnotherFormDatagrid();
                for (int i = 0; i < dataGridView1.SelectedRows.Count; i++)
                {
                    int index = showDatagridviewSelectedRowsDataInAnotherFormDatagridview.dataGridView1.Rows.Add();
                    showDatagridviewSelectedRowsDataInAnotherFormDatagridview.dataGridView1.Rows[index].Cells[0].Value = dataGridView1.SelectedRows[i].Cells[0].Value.ToString();
                    showDatagridviewSelectedRowsDataInAnotherFormDatagridview.dataGridView1.Rows[index].Cells[1].Value = dataGridView1.SelectedRows[i].Cells[1].Value.ToString();
                    showDatagridviewSelectedRowsDataInAnotherFormDatagridview.dataGridView1.Rows[index].Cells[2].Value = dataGridView1.SelectedRows[i].Cells[2].Value.ToString();
                    showDatagridviewSelectedRowsDataInAnotherFormDatagridview.dataGridView1.Rows[index].Cells[3].Value = dataGridView1.SelectedRows[i].Cells[3].Value.ToString();
                    showDatagridviewSelectedRowsDataInAnotherFormDatagridview.dataGridView1.Rows[index].Cells[4].Value = dataGridView1.SelectedRows[i].Cells[4].Value.ToString();
                    showDatagridviewSelectedRowsDataInAnotherFormDatagridview.dataGridView1.Rows[index].Cells[5].Value = dataGridView1.SelectedRows[i].Cells[5].Value.ToString();
                    showDatagridviewSelectedRowsDataInAnotherFormDatagridview.dataGridView1.Rows[index].Cells[6].Value = dataGridView1.SelectedRows[i].Cells[6].Value.ToString();
                    showDatagridviewSelectedRowsDataInAnotherFormDatagridview.dataGridView1.Rows[index].Cells[7].Value = dataGridView1.SelectedRows[i].Cells[7].Value.ToString();
                    showDatagridviewSelectedRowsDataInAnotherFormDatagridview.dataGridView1.Rows[index].Cells[8].Value = dataGridView1.SelectedRows[i].Cells[8].Value;

                }
                showDatagridviewSelectedRowsDataInAnotherFormDatagridview.ShowDialog();
            }
            else if (dataGridView1.Rows.Count == 0)
            {
                MessageBox.Show("DataGridView Is Empty......");
            }
            else if (dataGridView1.SelectedRows.Count == 0 && dataGridView1.Rows.Count > 0)
            {
                MessageBox.Show("DataGridView Has Data But There Is No Row Selected......");

            }
            else
            {
                MessageBox.Show("Unknown Error Try Again......");
            }
        }
COMPLETE VIDEO TUTORIAL
(CRUD) C# And Microsoft Access Database Tutorial – Insert Update Delete Select And Display On DataGridView Complete Project Guide Using Visual Studio 2010