How To Fix java.lang.ClassNotFoundException com.mysql.jdbc.Driver Error In Netbeans
How To Fix “java.lang.ClassNotFoundException com.mysql.jdbc.Driver” Error in Netbeans By Adding Mysql Driver Connector J Jar File.
A ClassNotFoundException is an exception thrown by the Java Virtual Machine (JVM) when it cannot locate a certain class during program execution. This can occur if the class is missing from the application’s classpath or if the classname is misspelled. To resolve this exception, the missing class must be added to the classpath, or the classname in the code must be updated.
When does the ClassNotFoundException occur?
A ClassNotFoundException is an exception thrown by the Java Virtual Machine (JVM) when it cannot locate a certain class during program execution. This exception happens if the class is not on the application’s classpath or if the class name is misspelled. The classpath is a list of locations where the JVM searches for class files, and it is utilized by the JVM to locate class files while they are being loaded. This exception is typically thrown during runtime when the JVM attempts to load a class that is absent from the classpath. This issue may be caused by missing JAR files, incorrect classpath settings, or missing dependencies.
Causes of ClassNotFoundException
- Class not in classpath: One of the main causes of a
ClassNotFoundExceptionis that the class is not present in the classpath. The classpath is a list of directories and jar files where the Java Virtual Machine (JVM) looks for class files when it is trying to load them. If the class is not present in any of the locations specified in the classpath, the JVM will throw aClassNotFoundException. - Incorrect classname in code: Another cause of
ClassNotFoundExceptionis when the class name is misspelled in the code. This can happen when the class name is typed incorrectly, or when the case of the class name does not match the case of the class file on the file system. This can lead the JVM to not being able to locate the class file, and throwing aClassNotFoundException. - Dependency issues:
ClassNotFoundExceptioncan also occur due to issues with dependencies. When an application depends on certain classes or libraries that are not present in the classpath, the JVM will not be able to locate those classes and will throw aClassNotFoundException. This can happen if the required jar files or libraries are missing, or if the dependencies are not specified correctly in the build configuration.
How to diagnose ClassNotFoundException
- Using stack trace
- Checking classpath
- Verifying classname
- Using stack trace: One way to diagnose a
ClassNotFoundExceptionis by using the stack trace. The stack trace provides a detailed view of the error, including the line of code where the exception occurred and the sequence of method calls leading up to the exception. By examining the stack trace, you can determine the class that was not found and the location where the exception was thrown. - Checking classpath: Another way to diagnose
ClassNotFoundExceptionis by checking the classpath. The classpath is a list of directories and jar files where the JVM looks for class files. By checking the classpath, you can ensure that the class that is causing the exception is present in the specified locations. - Verifying classname: Another way to diagnose
ClassNotFoundExceptionis by verifying the classname. This can be done by checking the classname in the code, making sure it matches the case of the class file on the file system and the package of the class. This can help ensure that the JVM is able to locate the class file and avoid the exception.
Solutions for ClassNotFoundException
- Adding missing class to classpath
- Correcting classname in code
- Resolving dependency issues
- Adding missing class to classpath: One solution for
ClassNotFoundExceptionis to add the missing class to the classpath. This can be done by adding the directory or jar file containing the class to the classpath. In some cases, you may need to add the missing class or jar file to the classpath at runtime, by passing the -cp or -classpath option to the java command. - Correcting classname in code: Another solution for
ClassNotFoundExceptionis to correct the classname in the code. This can be done by checking the classname for spelling errors, and making sure it matches the case of the class file on the file system and the package of the class. This will help ensure that the JVM is able to locate the class file and avoid the exception. - Resolving dependency issues: Another solution for
ClassNotFoundExceptionis to resolve dependency issues. This can be done by ensuring that all required jar files or libraries are present in the classpath and that the dependencies are specified correctly in the build configuration. This will help ensure that the JVM is able to locate all the required classes and avoid the exception.
Conclusion
In conclusion, ClassNotFoundException is an exception thrown by the Java Virtual Machine (JVM) when it is unable to find a specific class during the execution of a program. This exception can occur due to various reasons like missing JAR files, classpath misconfiguration, or missing dependencies. To diagnose the exception, you can use the stack trace, check the classpath, and verify the classname. To resolve the exception, you can add the missing class to the classpath, correct the classname in the code, and resolve dependency issues.
To avoid ClassNotFoundException in the future, it is important to keep the following tips in mind:
- Double-check the classpath to ensure that the class is present in the specified locations.
- Verify the classname to ensure that it matches the case of the class file on the file system and the package of the class.
- Manage dependencies correctly, ensure that all required jar files or libraries are present in the classpath and that dependencies are specified correctly in the build configuration.
- Keep the classpath clean, remove unnecessary classes or jar files from the classpath to avoid confusion.
- Make use of tools and frameworks that can help you manage classpath and dependencies like Maven, Gradle, etc.
- Use a good Integrated Development Environment (IDE) that can help you with classpath management.
How To Add Mysql Jdbc Driver In Netbeans
To add the MySQL JDBC driver in NetBeans, you can follow these steps:
- Download the MySQL JDBC driver from the official MySQL website or from any other trustworthy source. The driver is typically packaged as a JAR file, such as “mysql-connector-java-x.x.xx.jar”


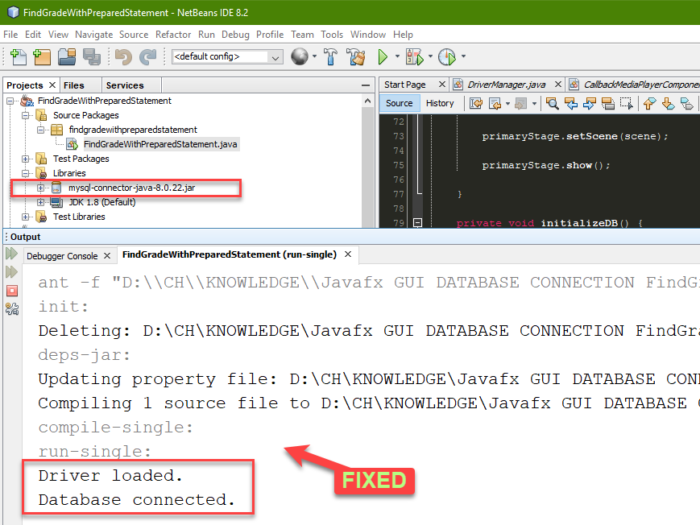
- In NetBeans, open your project and navigate to the Libraries node in the Projects window.

- Right-click the Libraries node and choose “Add JAR/Folder.”

- Locate the JAR file you downloaded in step 1 and add it to your project’s libraries.

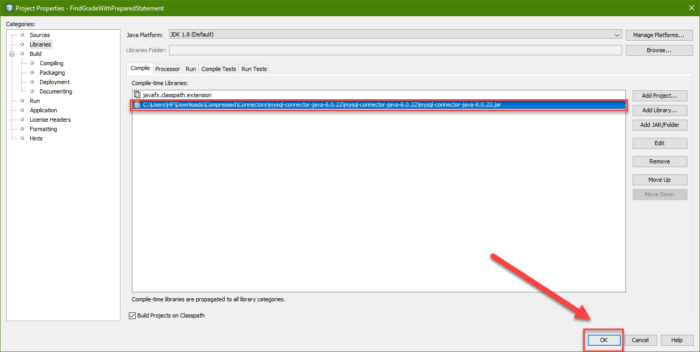

- If you are using a version of MySQL Connector/J older than 8.0.16, you should now add the JDBC driver to the classpath. Right-click on the new JAR file and select Properties. Go to the “Runtime” tab and check the “Compile” and “Run” checkboxes.
- If you are using a version of MySQL Connector/J 8.0.16 or newer, you should now add the JDBC driver to the module path. Right-click on the new JAR file and select Properties. Go to the “Compile” tab and check the “Add to module path” checkbox.
- Now you can use the JDBC driver in your project. You should include the following line of code in your program to load the driver:
Class.forName("com.mysql.cj.jdbc.Driver");
Handling java.lang.ClassNotFoundException for com.mysql.jdbc.Driver
In the code example, the java.lang.ClassNotFoundException is caught and handled for the com.mysql.jdbc.Driver class. This exception is thrown when the specified class cannot be found by the Class.forName() or ClassLoader.loadClass() methods. The code attempts to load the com.mysql.jdbc.Driver class using both methods and catches the exception if the class cannot be found. An error message is printed to the console to notify the user of the problem.
// Load the MySQL JDBC driver class using the Class.forName() method
try {
    Class.forName("com.mysql.jdbc.Driver");
} catch (ClassNotFoundException e) {
    // Catch the ClassNotFoundException and print an error message if the class cannot be found
    System.out.println("Failed to load MySQL JDBC driver: " + e.getMessage());
}

// Get the current thread's context class loader
ClassLoader contextClassLoader = Thread.currentThread().getContextClassLoader();

// Attempt to load a hypothetical class "com.mysql.jdbc.driver" using the context class loader
try {
    contextClassLoader.loadClass("com.mysql.jdbc.Driver");
} catch (ClassNotFoundException e) {
    // Catch the ClassNotFoundException and print an error message if the class cannot be found
    System.out.println("Failed to load class: " + e.getMessage());
}
This code is an example of how to load a JDBC driver for connecting to a MySQL database in Java. It attempts to load the MySQL JDBC driver class called “com.mysql.cj.jdbc.Driver” using two different methods, and if it fails to find the class it will catch and handle the resulting ClassNotFoundException.
The first method uses the Class.forName() method, which attempts to load the class with the specified name and returns a Class object representing that class. In this case, it tries to load the MySQL JDBC driver class “com.mysql.cj.jdbc.Driver”. If the class cannot be found, a ClassNotFoundException is thrown, which is caught and handled in a try-catch block. The catch block simply prints a message indicating that the class was not found, along with the error message provided by the exception.
The second method uses the current thread’s context class loader to load a hypothetical class “com.example.MyClass”. This is done by first getting a reference to the class loader using the getContextClassLoader() method, and then calling the loadClass() method on that loader. If the class cannot be found, a ClassNotFoundException is thrown, which is also caught and handled in a try-catch block. Again, the catch block simply prints a message indicating that the class was not found, along with the error message provided by the exception.
In summary, the updated code loads the MySQL JDBC driver class using the Class.forName() method and catches a ClassNotFoundException if the class cannot be found. It then gets the current thread’s context class loader and attempts to load a hypothetical class “com.mysql.jdbc.driver” using that loader. If the class cannot be found, a ClassNotFoundException is caught and an error message is printed to the console.
Overall, this code demonstrates how to load a JDBC driver for connecting to a MySQL database in Java, and how to handle the case where the driver class cannot be found. It is important to load the JDBC driver before attempting to use it, otherwise the code will not be able to connect to the MySQL database.
References
- Links to additional resources for further reading.
Video Tutorial
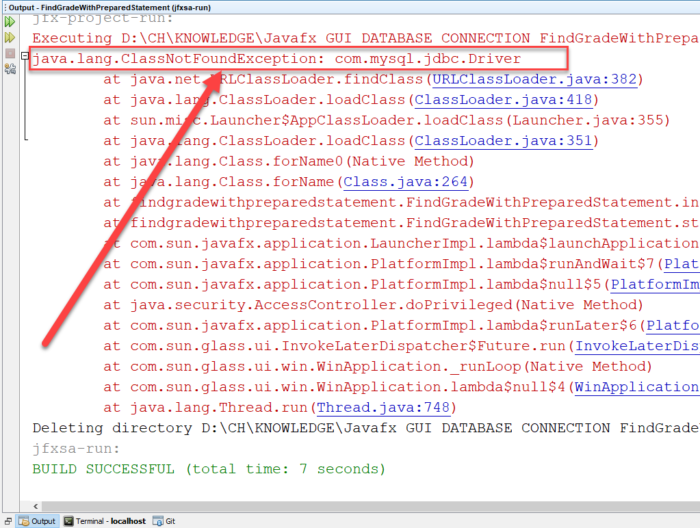
Netbeans Error Output
java.lang.ClassNotFoundException: com.mysql.jdbc.Driver
	at java.net.URLClassLoader.findClass(URLClassLoader.java:382)
	at java.lang.ClassLoader.loadClass(ClassLoader.java:418)
	at sun.misc.Launcher$AppClassLoader.loadClass(Launcher.java:355)
	at java.lang.ClassLoader.loadClass(ClassLoader.java:351)
	at java.lang.Class.forName0(Native Method)
	at java.lang.Class.forName(Class.java:264)
	at findgradewithpreparedstatement.FindGradeWithPreparedStatement.initializeDB(FindGradeWithPreparedStatement.java:84)
	at findgradewithpreparedstatement.FindGradeWithPreparedStatement.start(FindGradeWithPreparedStatement.java:37)
	at com.sun.javafx.application.LauncherImpl.lambda$launchApplication1$8(LauncherImpl.java:863)
	at com.sun.javafx.application.PlatformImpl.lambda$runAndWait$7(PlatformImpl.java:326)
	at com.sun.javafx.application.PlatformImpl.lambda$null$5(PlatformImpl.java:295)
	at java.security.AccessController.doPrivileged(Native Method)
	at com.sun.javafx.application.PlatformImpl.lambda$runLater$6(PlatformImpl.java:294)
	at com.sun.glass.ui.InvokeLaterDispatcher$Future.run(InvokeLaterDispatcher.java:95)
	at com.sun.glass.ui.win.WinApplication._runLoop(Native Method)
	at com.sun.glass.ui.win.WinApplication.lambda$null$4(WinApplication.java:185)
	at java.lang.Thread.run(Thread.java:748)